Deploy your first frontend build
Deploy a static site, such as a React or Vue production build, as a frontend worker. You need:
- An organization owner or admin account, or another cloud user with access to the site. Other signed-in users can view workers but can't change them.
- A zip of your build output with
index.htmlat its root, under the 10 MiB archive limit, and no.envfiles.
The REST examples use TARUVI_SITE_URL and TARUVI_API_KEY from your app's
Settings → Connect page.
Deploy from TaruviBase Console
-
In TaruviBase Console, open your site, select the Frontend tab, then select Deploy Frontend Worker.
-
Fill in the form:
Field What to enter Worker Name A display name, for example Quickstart UI.Custom Subdomain (Optional) The subdomain for the worker's address. Leave it blank to derive one from the name. Associated App (Optional) The app this site belongs to. ZIP file Your build archive. The Console accepts .ziponly.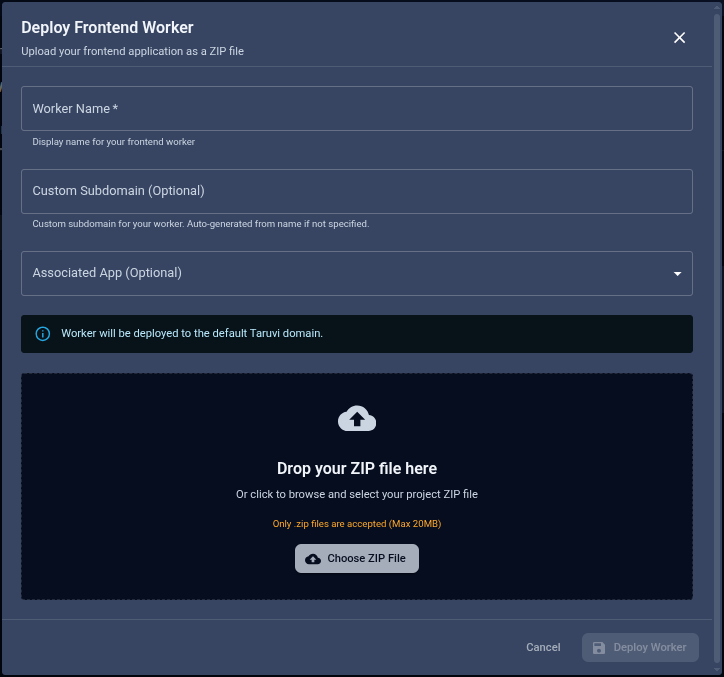
TaruviBase Console — Deploy Frontend Worker -
Select Deploy Worker.
The banner Worker will be deployed to the default TaruviBase domain means the
worker gets an address on TaruviBase's own domain. On development and staging sites
the subdomain gets an environment prefix, such as dev-. Open the worker in the
Console to see its address and open your site.
Deploy with the REST API
The same deploy is one multipart POST; the zip is sent as form data, not
JSON.
| Console field | Form field |
|---|---|
| Worker Name | name |
| Custom Subdomain | subdomain_input (optional) |
| Associated App | app (app slug, optional) |
| ZIP file | file (.zip, .tar, .tar.gz, or .tgz) |
curl -sS -X POST "${TARUVI_SITE_URL}/api/cloud/frontend_workers/" \
-H "Authorization: Api-Key ${TARUVI_API_KEY}" \
-F "name=Quickstart UI" \
-F "subdomain_input=quickstart-ui" \
The request returns 201 Created. The response includes:
slug— the worker's identifier in later requests. It can't be changed.web_url— the address where the live build is served.
The first build of a worker goes live automatically. Save the slug as
WORKER_SLUG.
Upload a new version
Upload a new build with a multipart PATCH to the worker. Add
set_active=true to make it live straight away; without it, the current live
build stays in place.
curl -sS -X PATCH "${TARUVI_SITE_URL}/api/cloud/frontend_workers/WORKER_SLUG/" \
-H "Authorization: Api-Key ${TARUVI_API_KEY}" \
-F "set_active=true"
Choose which build is live
List the worker's builds to find the uuid of the build you want:
curl -sS "${TARUVI_SITE_URL}/api/cloud/frontend_workers/WORKER_SLUG/builds/" \
  -H "Authorization: Api-Key ${TARUVI_API_KEY}"
Then make it live. The build must have finished uploading (status is
completed):
curl -sS -X PATCH "${TARUVI_SITE_URL}/api/cloud/frontend_workers/WORKER_SLUG/set-active-build/" \
  -H "Authorization: Api-Key ${TARUVI_API_KEY}" \
  -H "Content-Type: application/json" \
  -d '{"build_uuid": "BUILD_UUID"}'
Use this to roll back: point the worker at an earlier build.
Manage workers
| Task | Request |
|---|---|
| List workers | GET …/frontend_workers/ |
| Read one worker | GET …/frontend_workers/WORKER_SLUG/ |
| Rename a worker | PATCH …/frontend_workers/WORKER_SLUG/ with name |
| Delete a worker | DELETE …/frontend_workers/WORKER_SLUG/ |
| Delete a build | DELETE …/frontend_workers/WORKER_SLUG/builds/BUILD_UUID/ |
Every path starts with ${TARUVI_SITE_URL}/api/cloud/. See the
REST API reference for the full
list.