Store your first file with TaruviBase Storage
Create a test bucket, upload a file, download it, and clean up. This tutorial uses the REST API so you can see each step; the same operations are available in the Console and the SDKs.
Before you start
You need:
- A TaruviBase app. Create one if needed.
- An API key from an organization owner or admin. In the Console, open your app's Settings → Connect, select Generate API Key, and copy the values from the Environment tab. Creating and deleting buckets requires this level of access.
curland a small text file.
Set these in your shell:
export TARUVI_SITE_URL="https://YOUR_SITE_HOST"
export TARUVI_APP_SLUG="APP_SLUG"
printf 'TaruviBase API key: ' && read -rs TARUVI_API_KEY && export TARUVI_API_KEY && printf '\n'
Step 1: Create a bucket
In TaruviBase Console, open your app, select Storage, then Create Bucket. In
Create New Bucket, enter a Bucket Name such as Quickstart scratch, keep
Storage Provider as S3, set Category to Attachments and
Visibility to Private, then select Create.
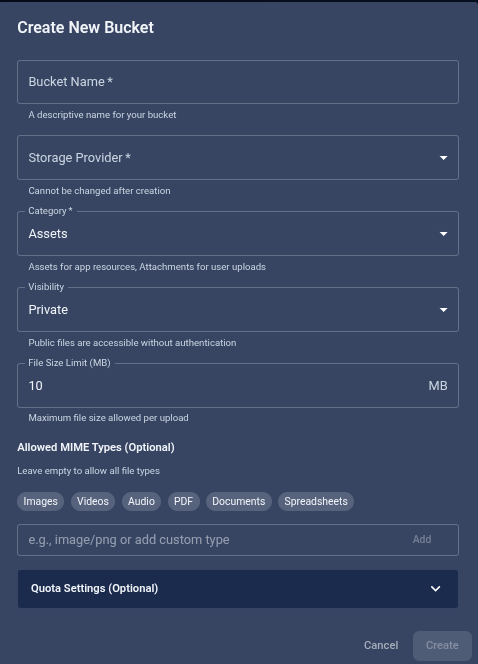
Or create the same bucket with the REST API:
curl -sS -X POST "${TARUVI_SITE_URL}/api/apps/${TARUVI_APP_SLUG}/storage/buckets/" \
  -H "Authorization: Api-Key ${TARUVI_API_KEY}" \
  -H "Content-Type: application/json" \
  -d '{"name":"Quickstart scratch","visibility":"private","app_category":"attachments"}'
app_category is required. An attachments bucket lets signed-in users read,
upload, and update files, which is enough for this tutorial.
Either way, the bucket gets a slug derived from its name — here
quickstart-scratch. The API response includes it. Save it for the next steps:
export BUCKET_SLUG="quickstart-scratch"
Checkpoint: GET .../storage/buckets/${BUCKET_SLUG}/ returns 200 with
"visibility": "private" and "storage_provider": "s3".
Step 2: Upload a file
echo "Hello, TaruviBase Storage." > hello.txt
curl -sS -X PUT "${TARUVI_SITE_URL}/api/apps/${TARUVI_APP_SLUG}/storage/buckets/${BUCKET_SLUG}/objects/hello.txt/" \
-H "Authorization: Api-Key ${TARUVI_API_KEY}" \
-F 'metadata={"purpose":"quickstart"}'
The path in the URL (hello.txt) becomes the file's path in the bucket. Keep
the trailing slash.
Checkpoint: the response is 201 Created and includes the file's path
(hello.txt), size, mimetype (text/plain), and your metadata.
Step 3: Download the file
curl -sS "${TARUVI_SITE_URL}/api/apps/${TARUVI_APP_SLUG}/storage/buckets/${BUCKET_SLUG}/objects/hello.txt/" \
  -H "Authorization: Api-Key ${TARUVI_API_KEY}" \
  -o hello.out.txt

diff hello.txt hello.out.txt && echo "OK: bytes match"
To read only the file's details, add ?metadata=true:
curl -sS "${TARUVI_SITE_URL}/api/apps/${TARUVI_APP_SLUG}/storage/buckets/${BUCKET_SLUG}/objects/hello.txt/?metadata=true" \
  -H "Authorization: Api-Key ${TARUVI_API_KEY}"
Checkpoint: the downloaded bytes match, and the details include
"purpose": "quickstart" and "visibility": "private" (a file's visibility
always follows its bucket).
Step 4: Clean up
Deleting a bucket is permanent. This tutorial bucket should contain only
hello.txt.
Delete the bucket, which also deletes hello.txt:
curl -sS -X DELETE "${TARUVI_SITE_URL}/api/apps/${TARUVI_APP_SLUG}/storage/buckets/${BUCKET_SLUG}/" \
  -H "Authorization: Api-Key ${TARUVI_API_KEY}"
Deleting a single file instead requires a policy rule that allows delete, which no default bucket policy includes. See Security and limits.
Checkpoint: GET .../storage/buckets/${BUCKET_SLUG}/ now returns 404.
rm hello.txt hello.out.txt
What's next
- How storage works — buckets, paths, and visibility
- Work with objects — uploads from the SDKs, metadata, and deletes
- Security and limits — review before production