Build with AI
Connect your AI coding tool to a TaruviBase app, then describe what you want to build. The TaruviBase Agents Plugin gives your tool TaruviBase-specific skills, and the TaruviBase MCP server lets it read and change your app's tables, functions, and other resources.
Before you start
You need:
- A TaruviBase app on a Development site. Create one first — it takes about two minutes.
- A project folder for your application code. Use an existing project, or start from the TaruviBase Refine starter template.
- Node.js with
npx, used only to run the plugin installer. - One of these AI coding tools:
| Tool | Setup |
|---|---|
| Claude Code, Cursor, OpenAI Codex, Kiro | The TaruviBase Agents Plugin configures these automatically (step 2). |
| Claude Desktop, Windsurf, VS Code with GitHub Copilot | Connect through the MCP server instead (see Connect over MCP only). |
1. Copy your app's connection values
-
Sign in to TaruviBase Console.
-
On Sites, open your Development site, then open your app on Apps.
-
In the app's left navigation, under Settings, select Settings, then open the Connect section. The page address ends in
/apps/APP_SLUG/settings?section=connect, and the Environment tab is open: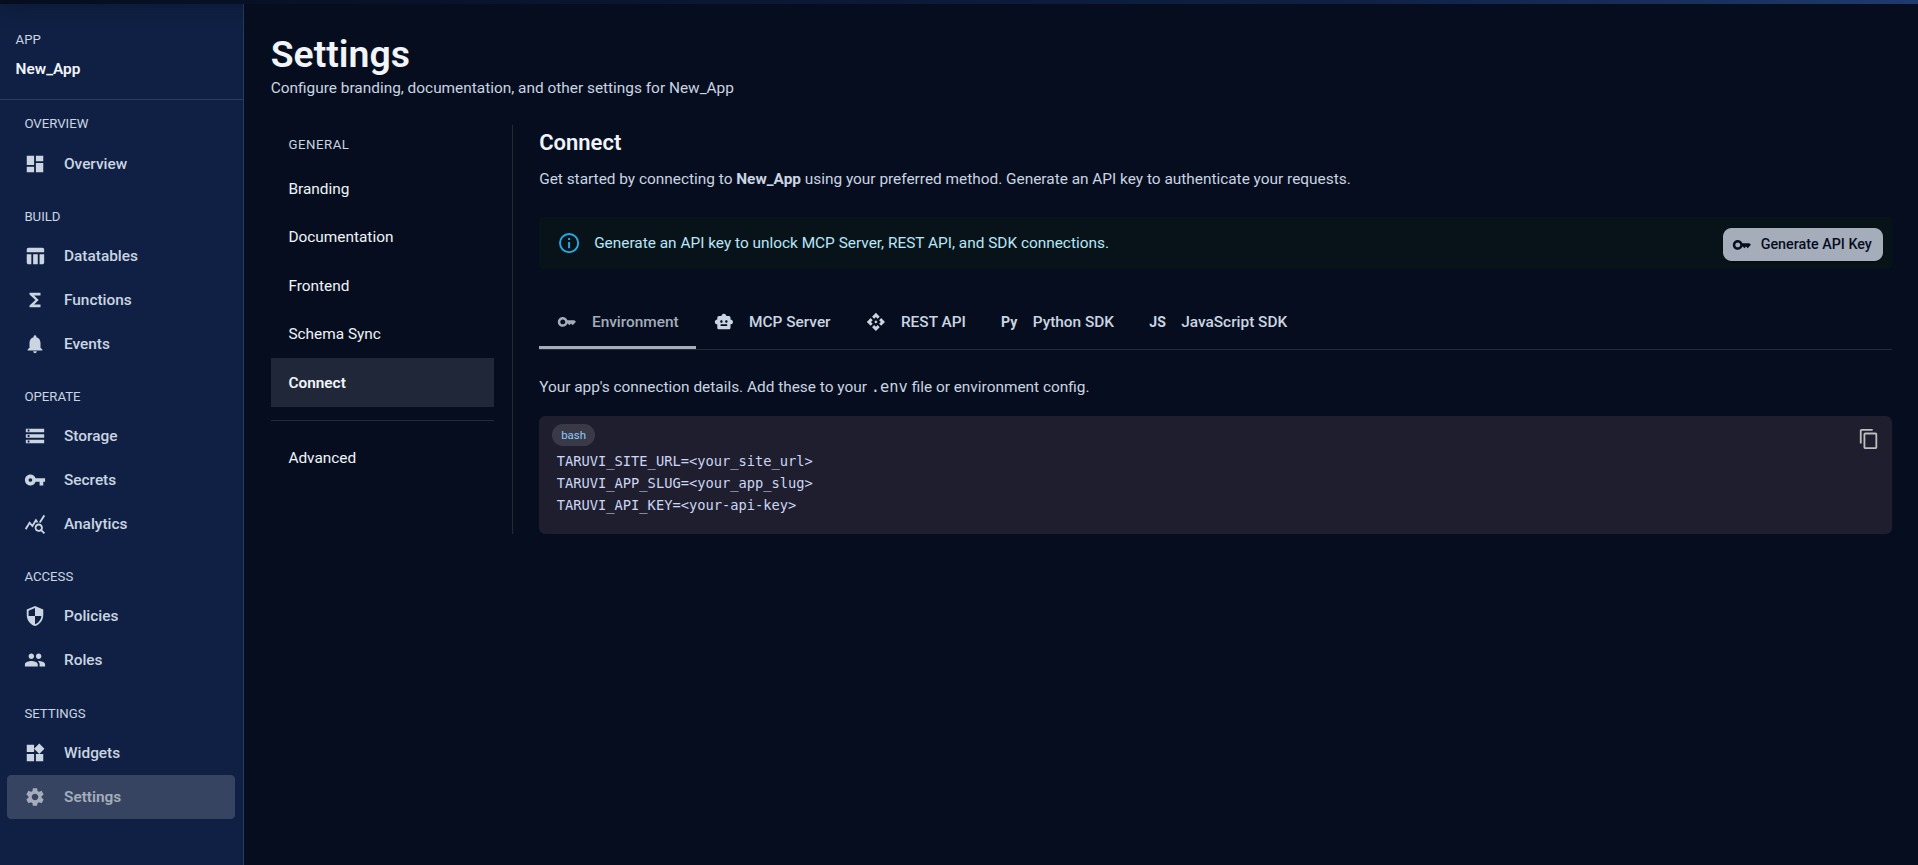
-
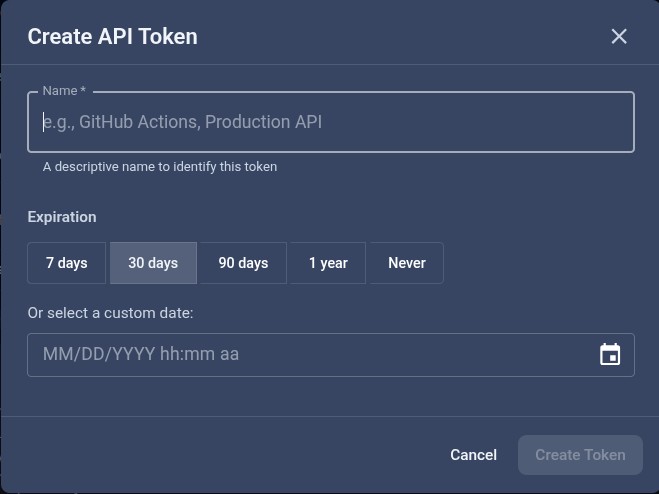
Select Generate API Key. In Create API Token, enter a Name, choose an Expiration (30 days is selected by default; avoid Never), then select Create Token. Copy the key when it appears — it is shown only once.
-
Back on the Environment tab, copy the three values your AI tool needs:
TARUVI_SITE_URL=https://YOUR_SITE_HOST
TARUVI_APP_SLUG=APP_SLUG
TARUVI_API_KEY=YOUR_GENERATED_API_KEY
Keep TARUVI_API_KEY out of source control, chat messages, tickets, and
screenshots. When it expires, generate a new key on the same page.
2. Install the TaruviBase Agents Plugin
In your project folder, run:
npx github:Taruvi-ai/taruvi-agents-plugin install --allow-non-template
The installer adds TaruviBase skills and agent configuration for Claude Code,
Cursor, OpenAI Codex, and Kiro to the project. It does not change your
application code. --allow-non-template lets it install into any project, not
only the TaruviBase starter template.
3. Ask your AI tool to set up TaruviBase
Open your AI tool in the project folder and send:
setup taruvi
The agent inspects your project and asks you to paste the Environment block
from step 1. It writes the values to your project's .env file and to the
tool's MCP configuration, then wires in the TaruviBase SDK. Make sure .env is
listed in .gitignore before you commit.
For framework-specific setup (Next.js, React, Vue, Refine, React Native, Node.js, and Python), follow the framework guides.
4. Check the connection
Ask your AI tool:
List the data tables in my TaruviBase app.
It should return the tables you see under Datatables in the Console. An empty list is correct for a new app.
Connect over MCP only
To give an AI tool access to your app without installing the plugin:
- In the Console, open your app's Settings → Connect and generate an API key.
- Open the MCP Server tab and select your tool.
- Copy the configuration shown into the file the tab names, such as
.cursor/mcp.jsonor.vscode/mcp.json. - Restart the tool so it loads the TaruviBase server.
The configuration sends your API key in the Authorization: Api-Key header, so
keep that file out of source control.
What to ask for
Describe the feature in plain language. Your AI tool creates the tables, functions, and application code, and connects them to TaruviBase:
- Data tables — "Create a projects table and a tasks table that belongs to a project."
- Backend logic — "Write a function that emails the owner when a task is marked done."
- Screens and forms — "Add a page that lists tasks with a form to create one."
- Sign-in — "Add TaruviBase sign-in to my app."
- Files — "Let users attach files to a task."
Try one of these starter prompts:
- Task manager
- CRM
- Inventory
- Booking
- Knowledge base
Build a task app with projects and tasks.
Show all tasks for each project, sorted by due date.
Build a CRM with companies, contacts, and deals.
Group deals by stage: prospecting, proposal, won, lost.
Build an inventory system. Products have a SKU, price, stock, and reorder level.
Show products by category and flag low stock.
Build a booking system for rooms and equipment with time slots.
Prevent double bookings.
Build a knowledge base. Documents are tagged, organized by topic,
and searchable with full-text search.
Review the code your AI tool writes before you deploy it.
Troubleshooting
The installer says the target does not look like a TaruviBase Refine template
Run the install command again with --allow-non-template, exactly as shown in
step 2.
My AI tool can't see TaruviBase
- The API key expired or was copied from another site. Generate a new key on the same app's Settings → Connect page and copy all three values from that page.
- The tool isn't configured. Check that the plugin installed into this project folder, or add the MCP configuration from the MCP Server tab.
- The tool wasn't restarted. Restart it after changing its configuration.
Setup did not finish
Send setup taruvi again and provide the values when asked.
Still stuck? Contact TaruviBase support.
What's next
- Framework guides — setup details for your framework
- Create your first task — the same connection, step by step, without AI
- Deploy with GitHub Actions — publish your app