Integrate TaruviBase with your framework
Connect a new or existing project to TaruviBase with the TaruviBase Agents Plugin and your AI coding tool. Pick your framework in the bar above — the choice applies to every framework-specific section on this page.
1. Prepare a TaruviBase app
Complete Create your first TaruviBase app, or use an existing app on a Development site.
2. Create your project
Create a project for your framework, or open an existing one.
- Next.js
- React
- Vue
- Refine
- React Native
- Node.js
- Python
Create a Next.js project with TypeScript and the App Router, then change into it:
npx create-next-app@latest my-app --ts --app && cd my-app
Create a React project with Vite and TypeScript, then change into it:
npm create vite@latest my-app -- --template react-ts && cd my-app && npm install
Create a Vue project with Vite and TypeScript, then change into it:
npm create vite@latest my-app -- --template vue-ts && cd my-app && npm install
Start from the TaruviBase Refine starter template, which already includes the TaruviBase client and providers:
git clone https://github.com/Taruvi-ai/refine-starter-template.git my-app && cd my-app && npm install
Create an Expo project and change into it:
npx create-expo-app@latest my-app && cd my-app
Create a Node.js project and change into it:
mkdir my-app && cd my-app && npm init -y
Or use an existing Node.js project (Express, Fastify, or plain Node).
Create a Python project with a virtual environment and change into it:
mkdir my-app && cd my-app && python -m venv .venv && source .venv/bin/activate
Or use an existing Python project (Django, FastAPI, Flask, or a plain script).
3. Install the TaruviBase Agents Plugin
In your project folder, run:
npx github:Taruvi-ai/taruvi-agents-plugin install --allow-non-template
This adds TaruviBase skills and agent configuration for Claude Code, Cursor, OpenAI Codex, and Kiro. Node.js is needed only to run the installer; your project keeps its own language and runtime. For other tools, see Connect over MCP only.
4. Connect your TaruviBase app
Open your AI tool in the project folder and send:
setup taruvi
When the agent asks for your connection values:
-
Sign in to TaruviBase Console.
-
On Sites, open your Development site, then open your app on Apps.
-
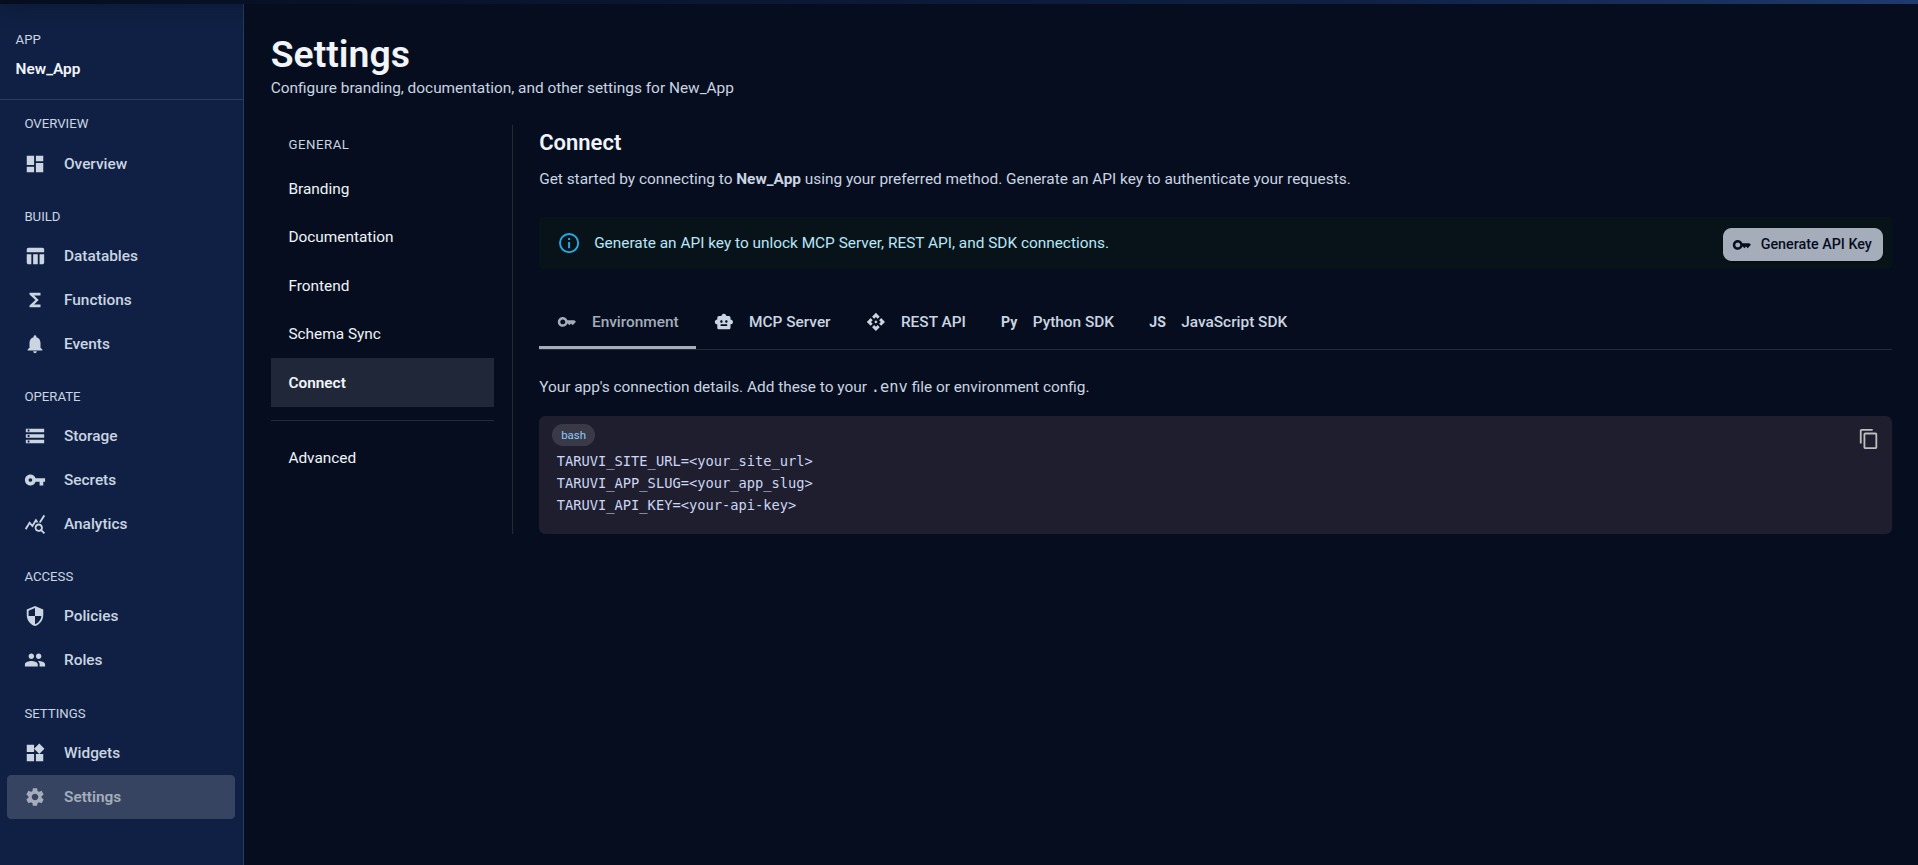
In the app's left navigation, under Settings, select Settings, then open the Connect section. The Environment tab is open:
-
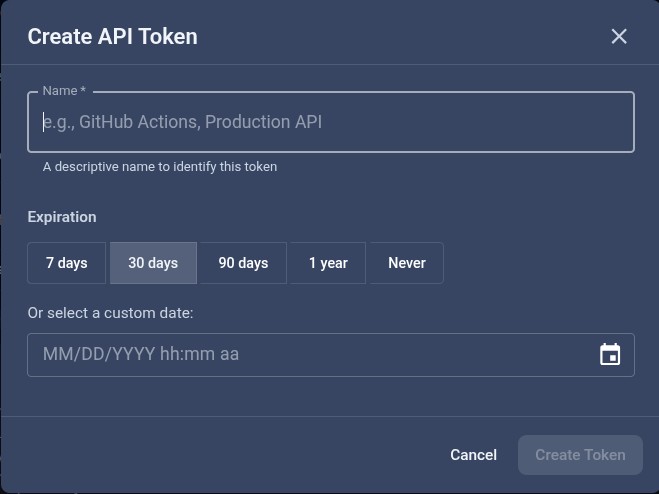
Select Generate API Key. In Create API Token, enter a Name, choose an Expiration (30 days is selected by default; avoid Never), then select Create Token. Copy the key when it appears — it is shown only once.
-
Back on the Environment tab, copy the whole block and paste it into the agent:
TARUVI_SITE_URL=https://YOUR_SITE_HOST
TARUVI_APP_SLUG=APP_SLUG
TARUVI_API_KEY=YOUR_GENERATED_API_KEY
The agent writes these values to your project's .env file and its MCP
configuration, then installs the TaruviBase SDK and connects your framework.
How your application authenticates depends on where its code runs:
| Code runs in | How it authenticates |
|---|---|
| The browser or a mobile app (React, Vue, Refine, React Native, Next.js client components) | Users sign in through TaruviBase's hosted sign-in. The app receives the user's session and never contains TARUVI_API_KEY. |
| Python (any framework) | The Python SDK sends TARUVI_API_KEY with each request. |
| Node.js or Next.js server code | @taruvi/sdk uses a signed-in user's session. For calls made with the API key, the agent calls the TaruviBase REST API with an Authorization: Api-Key header. |
Keep TARUVI_API_KEY in server-only configuration. Never put it in a
public build variable such as NEXT_PUBLIC_*, VITE_*, or EXPO_PUBLIC_*.
5. Verify the connection
Start the application with your framework's usual command:
- Next.js
- React
- Vue
- Refine
- React Native
- Node.js
- Python
npm run dev
npm run dev
npm run dev
npm run dev
npx expo start
npm start
Or your server's entry command, for example node server.js.
Run your project's entry point, for example:
python main.py
For a framework, use its own command, such as uvicorn main:app --reload for
FastAPI or python manage.py runserver for Django.
Then ask the agent to run a simple TaruviBase operation:
List my TaruviBase data tables.
The agent should also run your project's type-check, build, and test commands.
Troubleshooting
- The installer says the target does not look like a TaruviBase Refine template.
Run the install command with
--allow-non-template, as shown in step 3. - Setup did not finish. Send
setup taruviagain and paste the Environment block when asked. - Requests return
401. The API key expired or comes from a different site. Generate a new key on the same app's Settings → Connect page and copy all three values again.
Still stuck? Contact TaruviBase support.
What's next
- Create your first task — store and read data step by step
- Explore products — add storage, functions, events, secrets, and analytics
- Deploy with GitHub Actions — publish your app